from google.colab import drive
drive.mount('/content/gdrive')
Mounted at /content/gdriveTraining a new concept to Stable Diffusion model using Dreambooth, generating images of the new concept using the trained model, and saving the pipeline to HuggingFace Hub
![]()
In this post, we will be covering Dreambooth which is similar to Textual Inversion, train a new concept using it and push our model to HuggingFace Hub, from where anyone can use our fine-tuned model. This post is based on the HuggingFace Notebook found here. So let’s get started
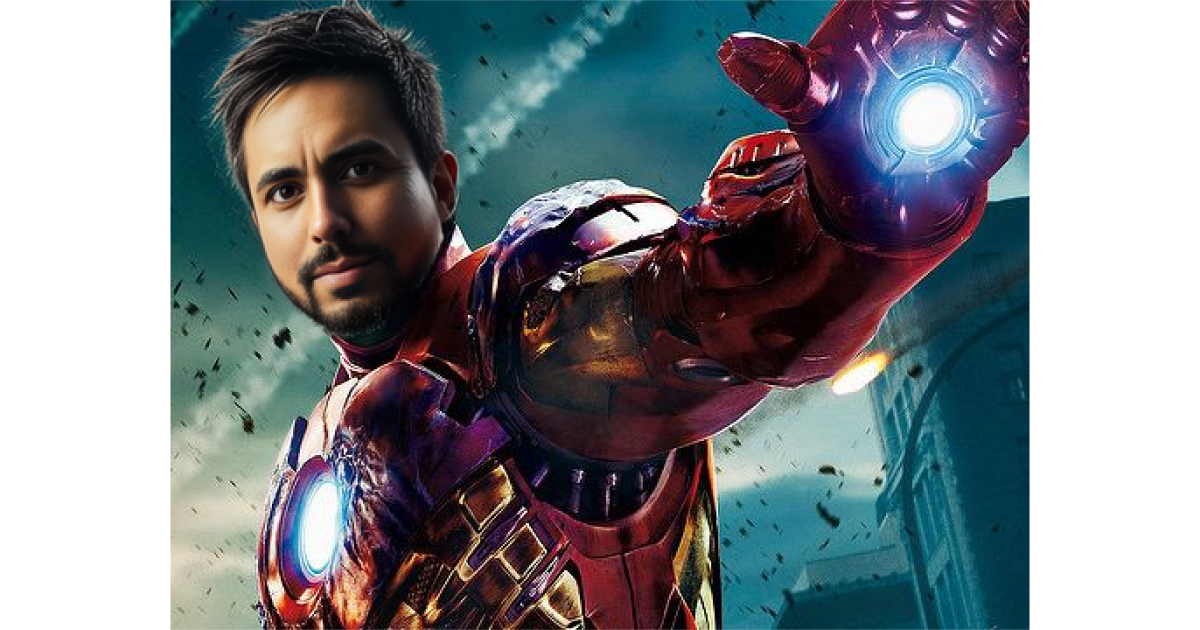
Stable Diffusion results are amazing. But what if you want to generate images of subjects that are personal to you. Can it render images of your cute pet dog having fun at the beach? What about you being the main character of superhero movie saving the World?. Yes, you absolutely can personalize the Stable Diffusion model using Dreambooth
Dreambooth is an approach to teach a new concept by fine-tuning a pretrained text-to-image model such that it binds a unique token with the new concept of images. If you are aware of fine-tuning vision models, you might be thinking at this point that it will take hundreds of images and hours of training to fine-tune Stable Diffusion model, but to our surprise only a minimum of 5 images of the new subject is required!
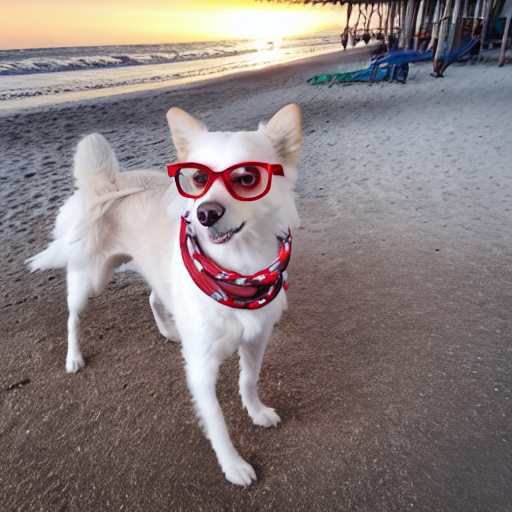
The image on the right above is generated from the model which I fine-tuned for around 30 minutes on Tesla T4 GPU and 16GB RAM with just 6 images of my pet dog. Amazing isn’t it!
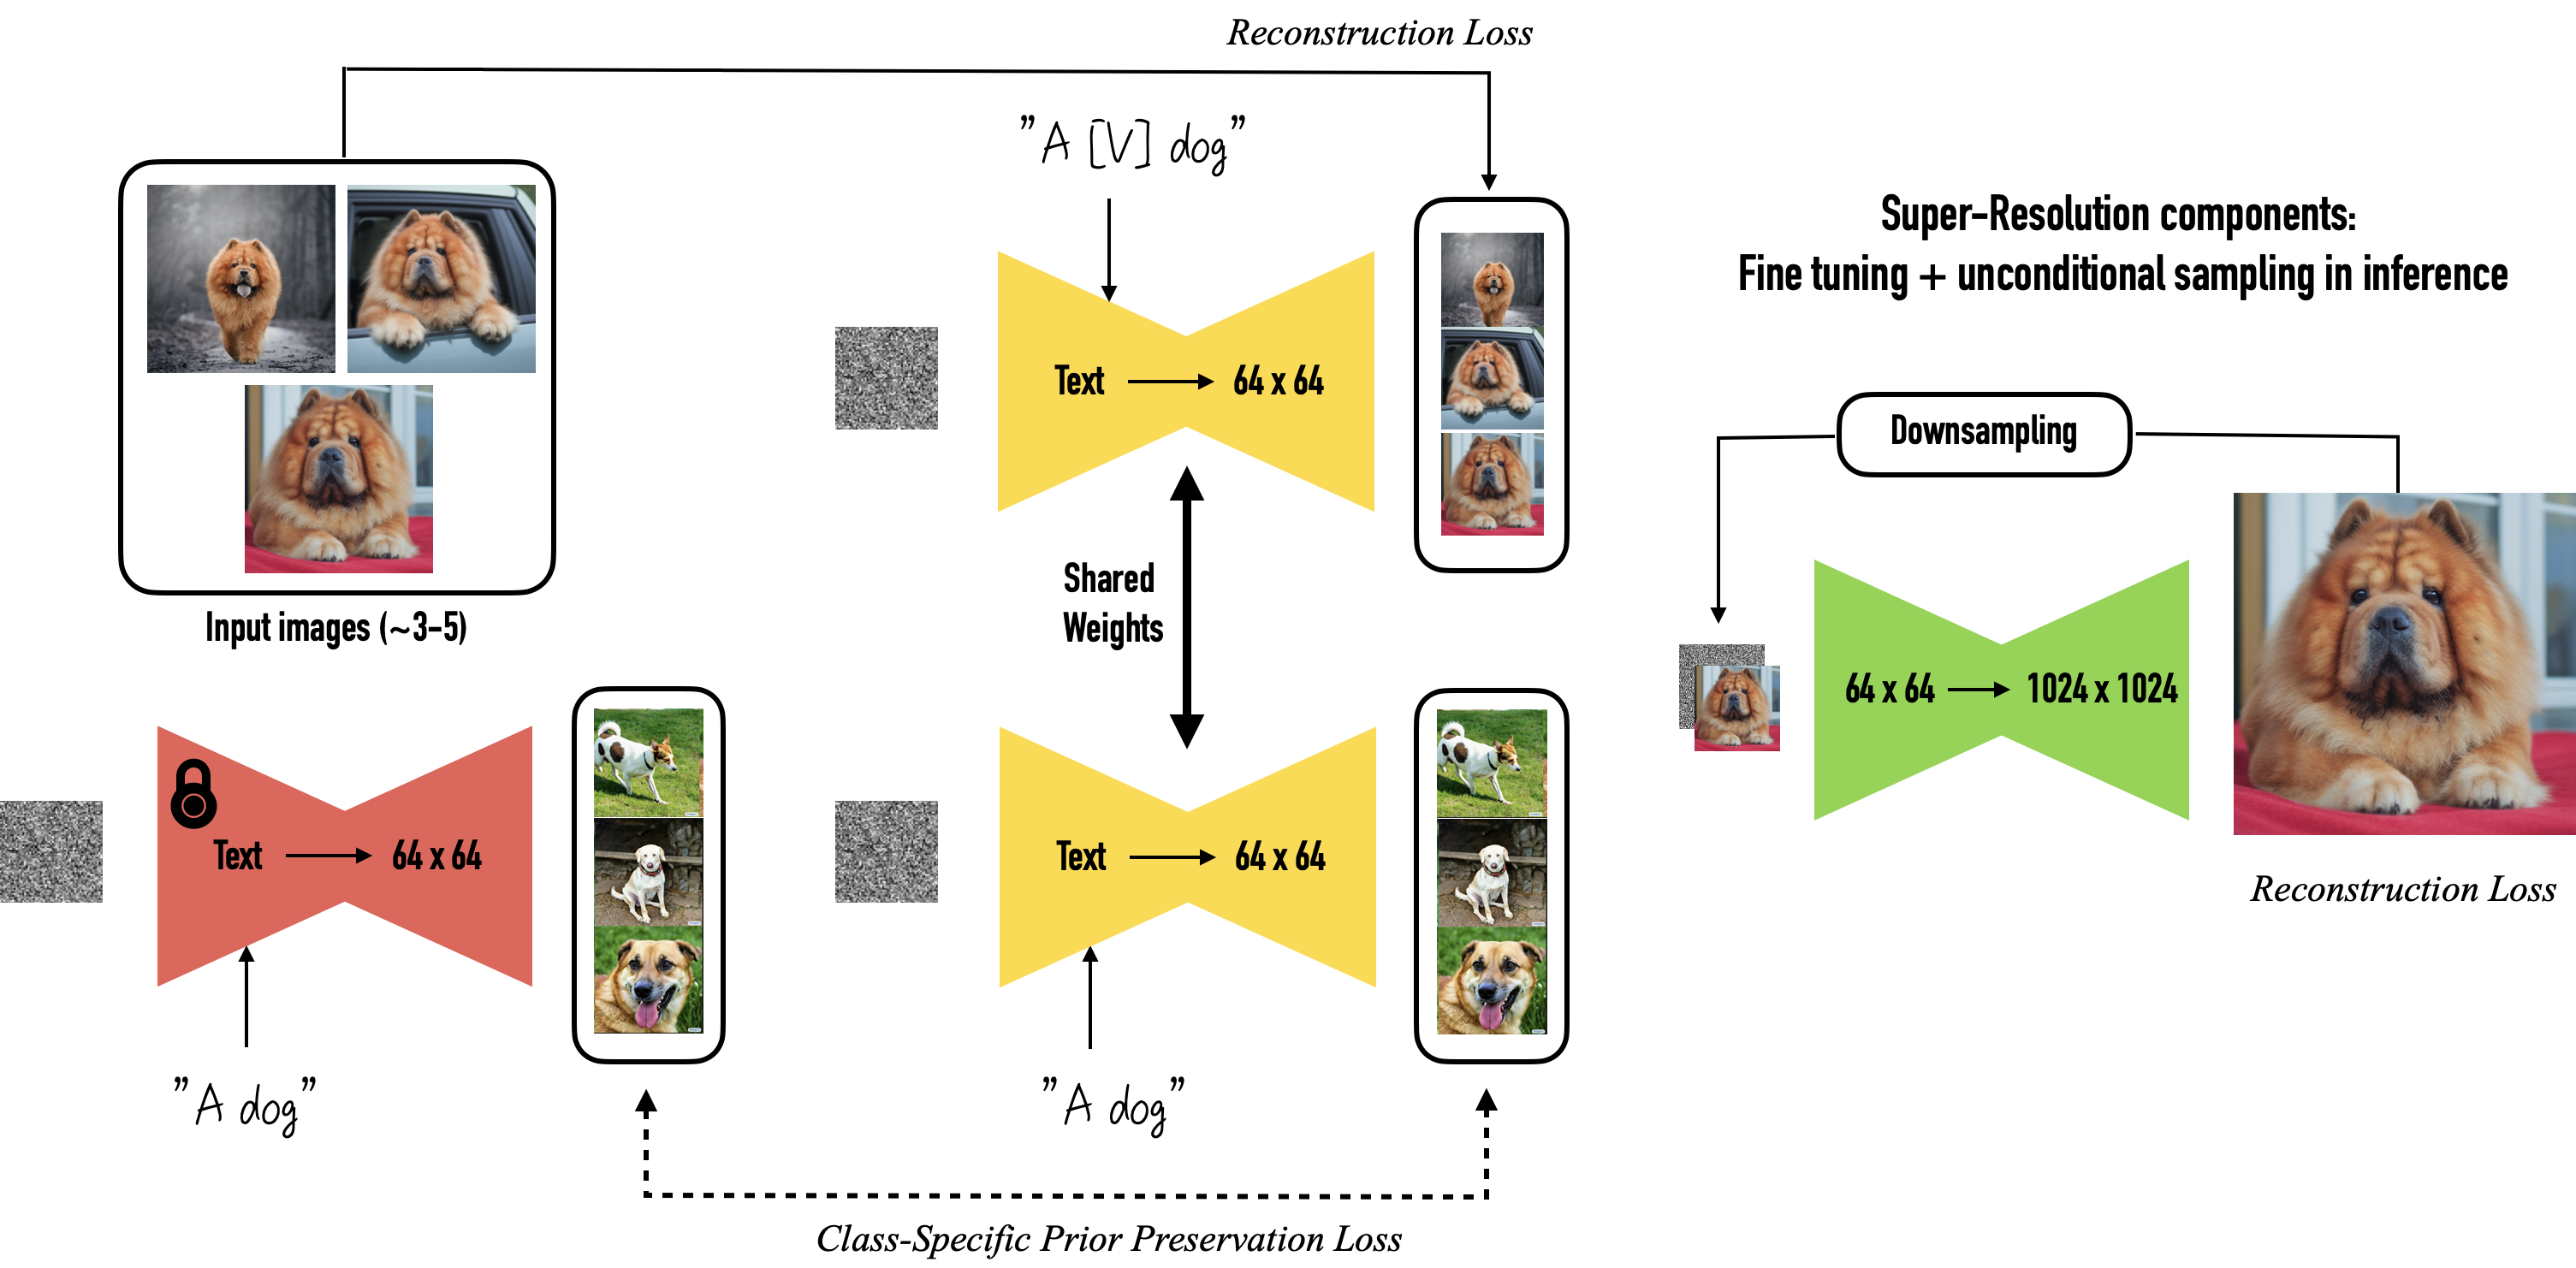
Dreambooth approach of fine-tuning the text-to image diffusion model is as follows:
1. We pair the input images of our interested subject and text prompt containing a unique identifier and fine tune the model. (Example - for unique identifier you can use a token which is less frequently used such as sks.So the prompt will be “A photo of sks dog”)
2. We also pass the class of the subject as a prompt while fine-tuning the model and apply class-specific prior preservation loss (Example - “A photo of a dog”)
Prior Preservation doesn’t seem to make huge difference except when trained on faces. So prior preservation is not used while training in this post. Checkout this amazing detailed article in which they have experimented training dreambooth with different settings. You can follow the HuggingFace notebook in which they have implemented prior preservation
Let’s install the required libraries and load the CompVis/stable-diffusion-v1-4 models in the next section
At first, we will be connecting to Google Drive from Google Colab. This allows us to read images saved in Drive for training model and also save the trained model to the Drive
from google.colab import drive
drive.mount('/content/gdrive')Mounted at /content/gdriveWe will be downloading the required libraries as we did in previous posts. We will be installing and importing an additional library named bitsandbytes. It provides an 8-bit optimizer which saves memory and increases speed while training. For more details checkout this repo
We will also be using accelerate library which helps in distributed training, gradient accumulation and many more.
!pip install -Uq accelerate transformers diffusers ftfy!pip install -qq bitsandbytesWe can authenticate our notebook to Huggingface services using the commands below. Since we will be pushing our model to HuggingFace Hub later, we will need write permissions. So you need to create an Access Token with write permission and use it to authenticate
from huggingface_hub import notebook_login
notebook_login()
Token is valid.
Your token has been saved in your configured git credential helpers (store).
Your token has been saved to /root/.huggingface/token
Login successfulfrom PIL import Image
import numpy as np
from tqdm.auto import tqdm
from pathlib import Path
import math
import torch
import torch.nn.functional as F
from torch.utils.data import Dataset
from torchvision import transforms as tfms
from diffusers import AutoencoderKL, DDPMScheduler, PNDMScheduler, StableDiffusionPipeline, UNet2DConditionModel
from diffusers.optimization import get_scheduler
from diffusers.pipelines.stable_diffusion import StableDiffusionSafetyChecker
from accelerate import Accelerator
from accelerate.logging import get_logger
from accelerate.utils import set_seed
from transformers import CLIPFeatureExtractor, CLIPTextModel, CLIPTokenizer
import bitsandbytes as bnbdef image_grid(imgs, rows, cols):
w,h = imgs[0].size
grid = Image.new("RGB", size=(cols*w, rows*h))
for i, img in enumerate(imgs):grid.paste(img, box=(i%cols*w, i//cols*h))
return gridNext, we will initialize the core components of the Stable Diffusion model with the weights of CompVis/stable-diffusion-v1-4 repo
model_path="CompVis/stable-diffusion-v1-4"text_encoder = CLIPTextModel.from_pretrained(model_path, subfolder="text_encoder")
vae = AutoencoderKL.from_pretrained(model_path, subfolder="vae")
unet = UNet2DConditionModel.from_pretrained(model_path, subfolder="unet")
tokenizer = CLIPTokenizer.from_pretrained(model_path, subfolder="tokenizer")We need to provide the images of our subject and the prompt with the unique token to fine-tune model. So let’s create a dataset which takes images and prompts as input. The dataset needs to convert the images into tensor which is done using PyTorch’s transforms. It also should return input_ids for the prompt which is provided by the Tokenizer. Both pixel values and prompt ids are returned as dictionary
class DreamBoothDataset(Dataset):
    def __init__(self, images_path, prompts , tokenizer, size =512, center_crop=False):
        self.size, self.center_crop = size, center_crop
        self.tokenizer = tokenizer
        self.images_path = Path(images_path)
        if not self.images_path.exists():
            raise ValueError("Images path doesn't exist")

        self.images = list(Path(images_path).iterdir())
        self.num_of_images = len(self.images)
        self.prompts = prompts

        self.image_transforms = tfms.Compose([
            tfms.Resize(size, interpolation = tfms.InterpolationMode.BILINEAR),
            tfms.CenterCrop(size) if center_crop else tfms.RandomCrop(size),
            tfms.ToTensor(),
            tfms.Normalize([0.5],[0.5])
        ])


    def __len__(self):
        return self.num_of_images

    def __getitem__(self, index):
        example = {}
        image = Image.open(self.images[index%self.num_of_images]).convert("RGB")
        example["images"] = self.image_transforms(image)
        example["prompt_ids"] = self.tokenizer(self.prompts, padding="do_not_pad", truncation=True,
                                               max_length=self.tokenizer.model_max_length).input_ids

        return example
Dataloader helps us to sample minibatches from our dataset. Since our dataset returns dictionary, we have to tell the Dataloader how it can combine and return minibatches of pixelvalues and prompt_ids.
def collate_fn(examples):
    pixels    = [example["images"] for example in examples]
    input_ids = [example["prompt_ids"] for example in examples]

    pixels = torch.stack(pixels).to(memory_format=torch.contiguous_format).float()
    input_ids = tokenizer.pad({"input_ids":input_ids}, padding=True, return_tensors="pt").input_ids

    batch = {
        "input_ids":input_ids,
        "pixel_values":pixels
    }

    return batch
train_dataset = DreamBoothDataset(
images_path = "/content/gdrive/My Drive/pintu",
prompts = "a photo of a sks dog",
tokenizer = tokenizer,
size=512,
center_crop=True
)
train_dataloader = torch.utils.data.DataLoader(train_dataset, batch_size= 1, shuffle=True, collate_fn=collate_fn)Now let’s view the our data. Below are the 6 images of my pet Pintu which are used for training
images =[Image.open(train_dataset.images[i]).resize((256,256)).convert("RGB") for i in range(len(train_dataset))]
image_grid(images, rows=1, cols=len(train_dataset))
learning_rate=5e-06
max_train_steps =500
train_batch_size=1
gradient_accumulation_steps=2
use_8bit_adam=True
output_dir = "/content/gdrive/My Drive/pintu_dreambooth"
torch_device = "cuda" if torch.cuda.is_available() else "cpu"The function dreambooth_trainer fine-tunes the Stable Diffusion model. We fine-tune the model for 500 steps at a learning rate of 5e-06. The pixel_values of the images from the dataloader are passed to VAE’s encoder to generate latents. The prompt_ids are passed to the text_encoder to generate embeddings. Random noise is added at each step and the loss is calculated. The loss is then backpropogated and the weights of the model are updated. After the training is completed, all the components of the model are saved to the output_dir path which in our case gets saved to Google Drive
def dreambooth_trainer(data, text_encoder, vae, unet):

    accelerator=Accelerator(gradient_accumulation_steps=gradient_accumulation_steps)
    set_seed(90000)
    unet.enable_gradient_checkpointing()

    if use_8bit_adam:
        optimizer_class = bnb.optim.AdamW8bit
    else:
        optimizer_class = torch.optim.AdamW

    optimizer = optimizer_class(unet.parameters(), lr=learning_rate)

    noise_scheduler = DDPMScheduler(beta_start= 0.00085, beta_end = 0.012, beta_schedule="scaled_linear",
                                    num_train_timesteps=1000)


    unet, optimizer, train_dataloader = accelerator.prepare(unet, optimizer, data)

    text_encoder.to(torch_device)
    vae.to(torch_device)


    num_update_steps_per_epoch = math.ceil(len(train_dataloader)/gradient_accumulation_steps)
    num_train_epochs = math.ceil(max_train_steps/num_update_steps_per_epoch)
    total_batch_size = train_batch_size *accelerator.num_processes * gradient_accumulation_steps

    progress_bar = tqdm(range(max_train_steps), disable=not accelerator.is_local_main_process)
    progress_bar.set_description("Steps")
    global_step = 0

    for epoch in range(num_train_epochs):
        unet.train()
        for step, batch in enumerate(train_dataloader):
            with accelerator.accumulate(unet):
                with torch.no_grad():
                    latents = vae.encode(batch["pixel_values"]).latent_dist.sample()
                    latents*=0.18215


                noise = torch.randn(latents.shape).to(latents.device)
                bsz = latents.shape[0]
                timesteps = torch.randint(0, noise_scheduler.config.num_train_timesteps,(bsz,), device=latents.device).long()
                noisy_latents = noise_scheduler.add_noise(latents, noise, timesteps)

                with torch.no_grad():
                    encoder_hidden_states = text_encoder(batch["input_ids"])[0]

                noise_pred = unet(noisy_latents, timesteps, encoder_hidden_states).sample

                loss = F.mse_loss(noise_pred, noise, reduction="none").mean([1,2,3]).mean()

                accelerator.backward(loss)
                optimizer.step()
                optimizer.zero_grad()

            if accelerator.sync_gradients:
                progress_bar.update(1)
                global_step+=1


            logs = {"loss":loss.detach().item()}
            progress_bar.set_postfix(**logs)

            if global_step>=max_train_steps:break

        accelerator.wait_for_everyone()

    if accelerator.is_main_process:
        pipeline=StableDiffusionPipeline(
            text_encoder=text_encoder, vae=vae, unet=unet,
            tokenizer=tokenizer,
            scheduler = PNDMScheduler(
                beta_start=0.00085, beta_end=0.012, beta_schedule="scaled_linear", skip_prk_steps=True
            ),
            safety_checker=StableDiffusionSafetyChecker.from_pretrained("CompVis/stable-diffusion-safety-checker"),
            feature_extractor=CLIPFeatureExtractor.from_pretrained("openai/clip-vit-base-patch32"))
        pipeline.save_pretrained(output_dir)
import accelerate
accelerate.notebook_launcher(dreambooth_trainer, args=(train_dataloader,text_encoder, vae, unet), num_processes = 1)Now we can load the model from the saved directory and use it for inference. To get high quality images, you can use prompts from Lexica and replace with your unique identifier.
output_dir = "/content/gdrive/My Drive/pintu_dreambooth"
torch_device = "cuda" if torch.cuda.is_available() else "cpu"

pipe = StableDiffusionPipeline.from_pretrained(
        output_dir,
        torch_dtype=torch.float16,
    ).to(torch_device)
Below are some of the astonishing results generated by our fine-tuned model!
prompt = "a beautiful portrait of a cute sks dog, beautiful detailed eyes, golden hour, standing on a beach, outdoors, professional award winning portrait photography, Zeiss 150mm f/ 2.8 Hasselblad"

num_samples = 3
num_rows = 3

all_images = []
for _ in range(num_rows):
    images = pipe([prompt] * num_samples, num_inference_steps=75, guidance_scale=7.5, seed = 'random').images
    all_images.extend(images)

grid = image_grid(all_images, num_samples, num_rows)
grid 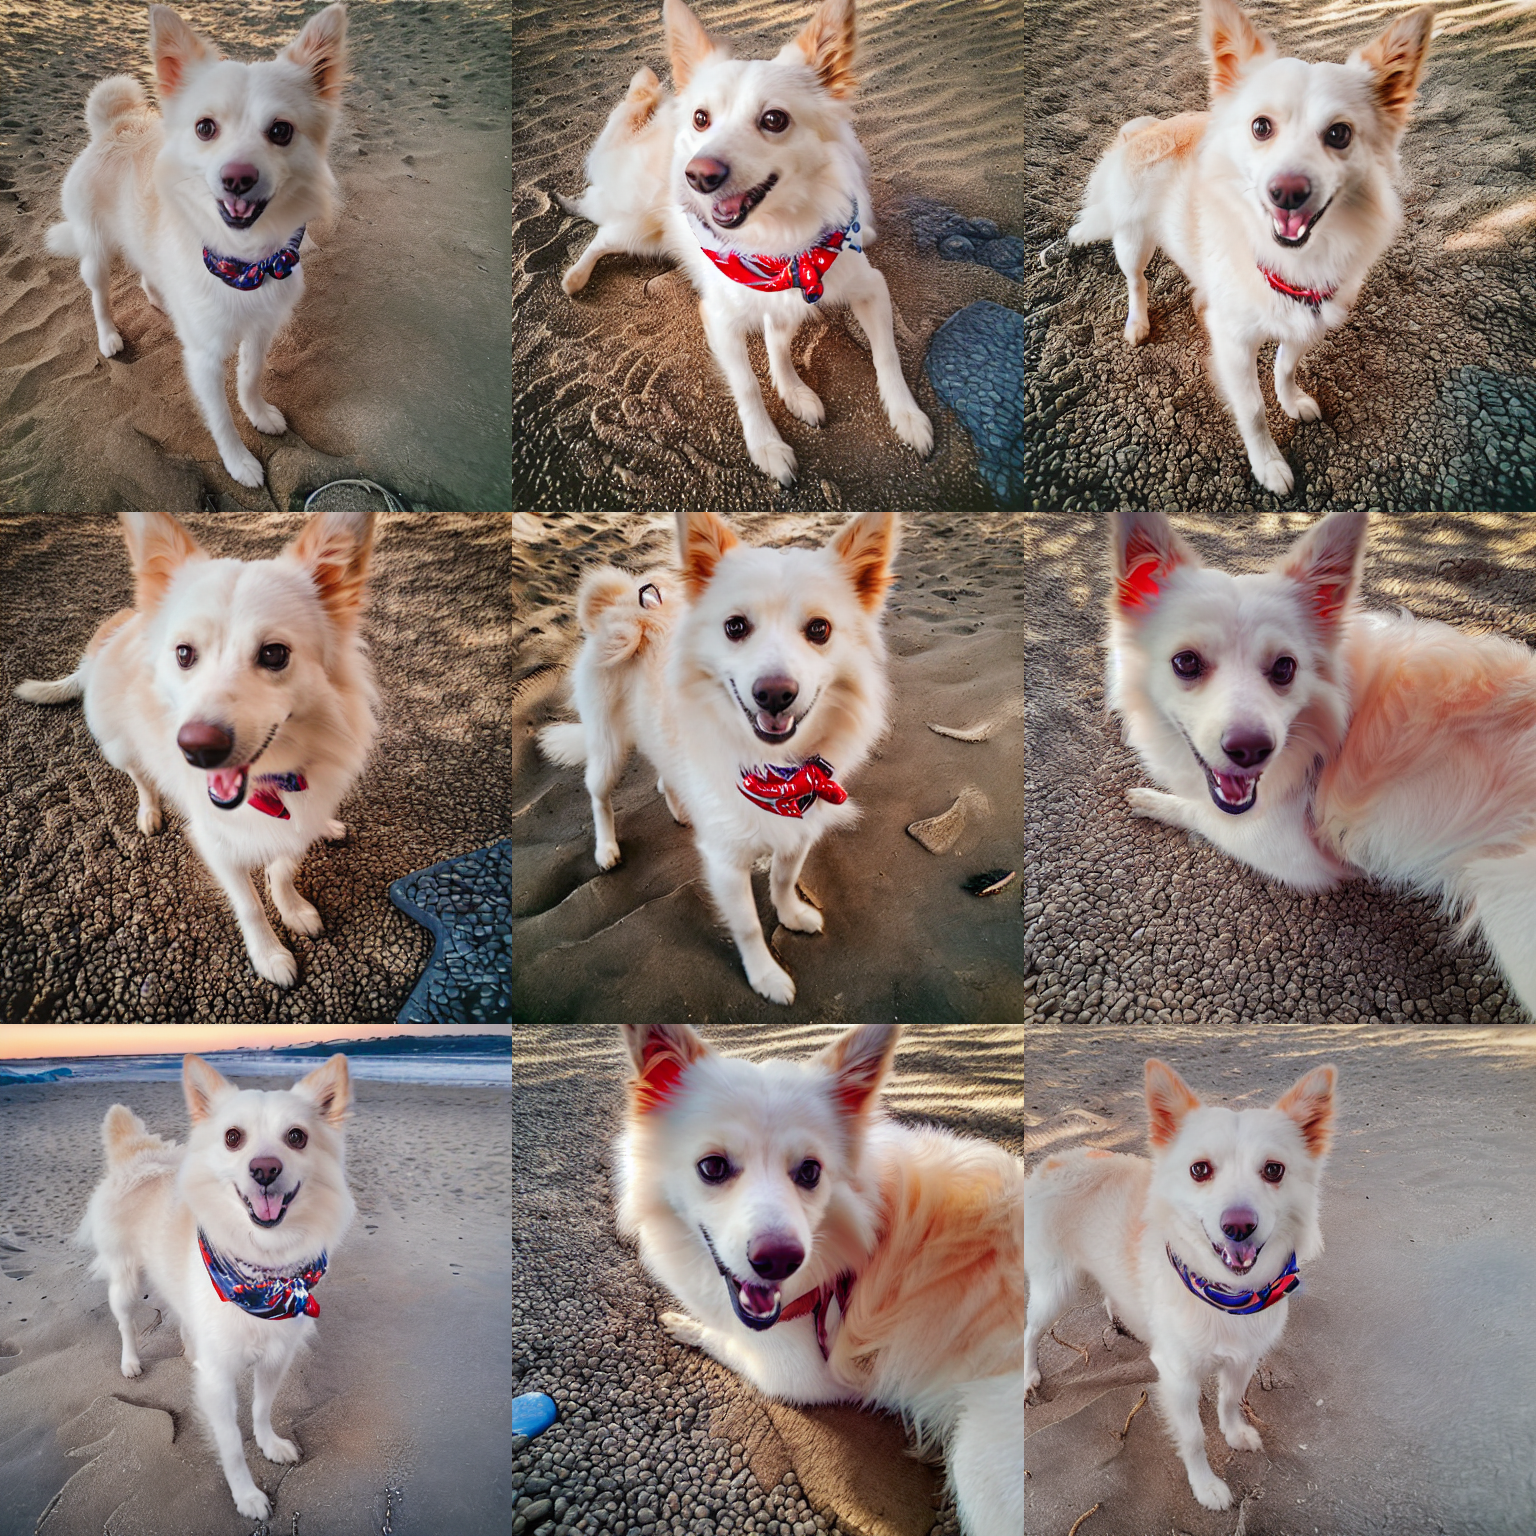
prompt = "portrait of a sks dog wearing a hat, realism, realistic, photorealism, f 3. 5, photography, octane render, trending on artstation, artstationhd, artstationhq, unreal engine, cinema 4 d, 8 k, detailed fur "

num_samples = 3
num_rows = 3

# def dummy_checker(images, **kwargs): return images, False
# pipe.safety_checker = dummy_checker

all_images = []
for _ in range(num_rows):
    images = pipe([prompt] * num_samples, num_inference_steps=75, guidance_scale=7.5, seed = 'random').images
    all_images.extend(images)

grid = image_grid(all_images, num_samples, num_rows)
grid 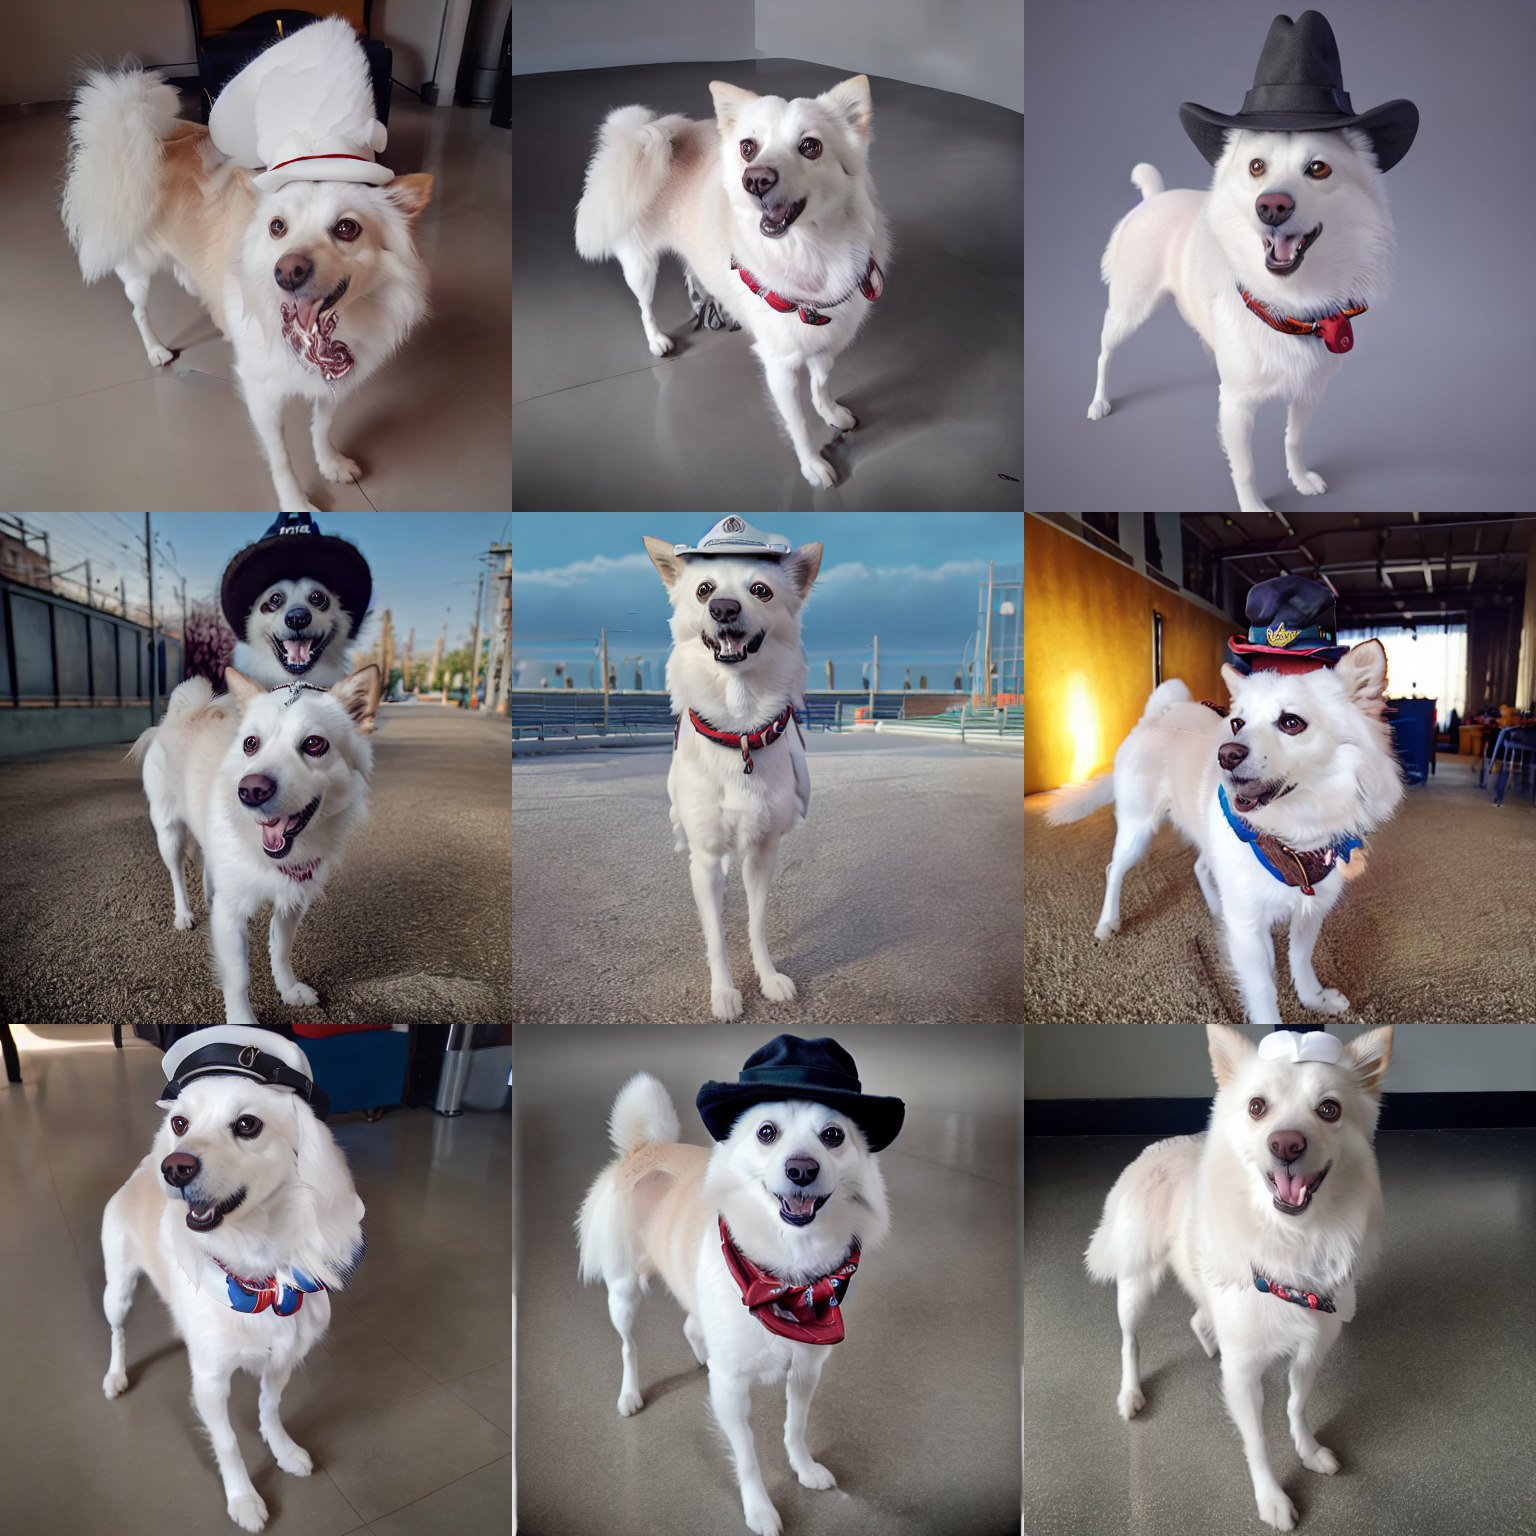
prompt = "sks dog as a realistic fantasy knight, closeup portrait art by donato giancola and greg rutkowski, digital art, trending on artstation, symmetry!! "

num_samples = 3
num_rows = 3


all_images = []
for _ in range(num_rows):
    images = pipe([prompt] * num_samples, num_inference_steps=75, guidance_scale=7.5, seed = 'random').images
    all_images.extend(images)

grid = image_grid(all_images, num_samples, num_rows)
grid 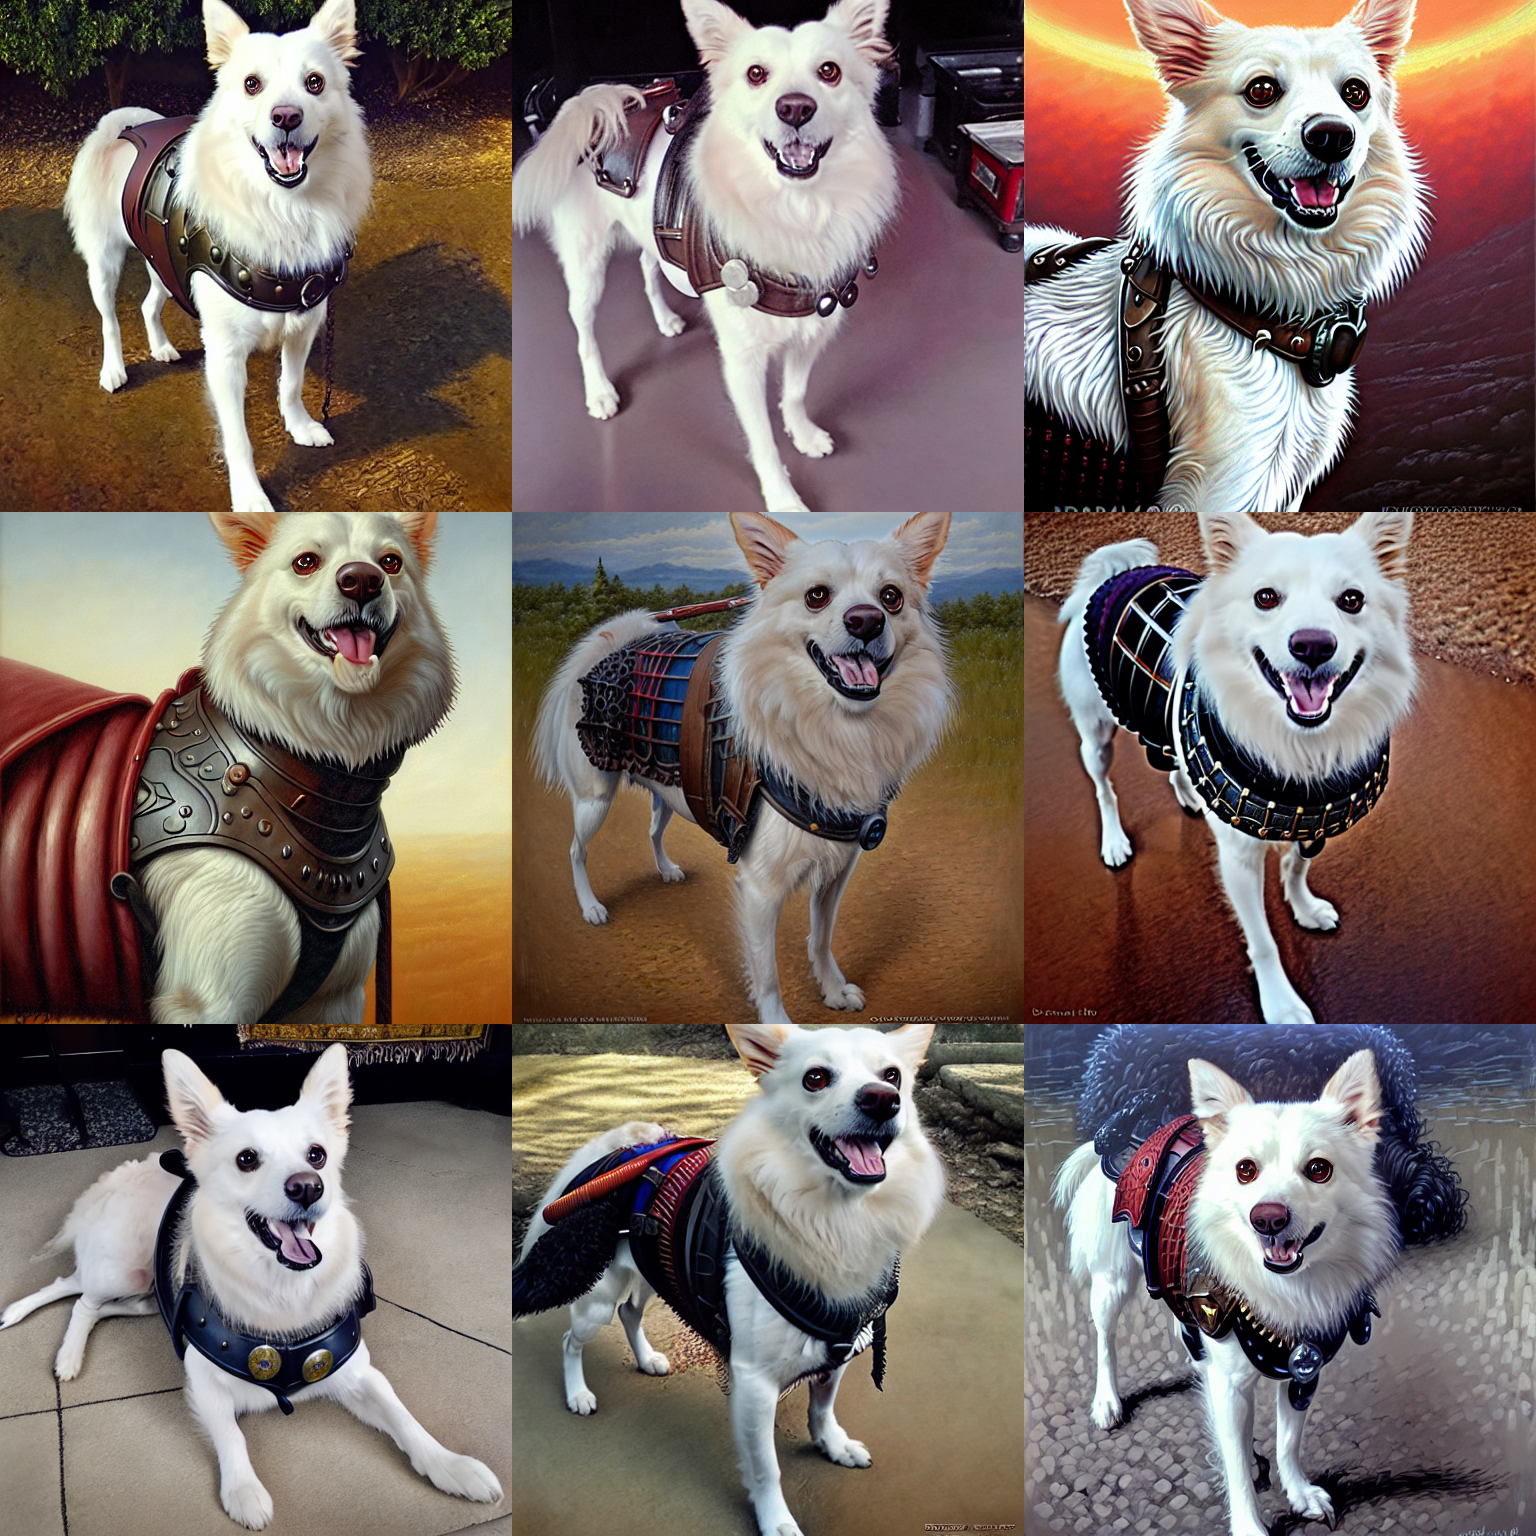
prompt = "white sks dog, with reflection in the puddle, foggy old forest, very detailed, 4 k, professional photography "

num_samples = 3
num_rows = 3


all_images = []
for _ in range(num_rows):
    images = pipe([prompt] * num_samples, num_inference_steps=75, guidance_scale=7.5, seed = 'random').images
    all_images.extend(images)

grid = image_grid(all_images, num_samples, num_rows)
grid 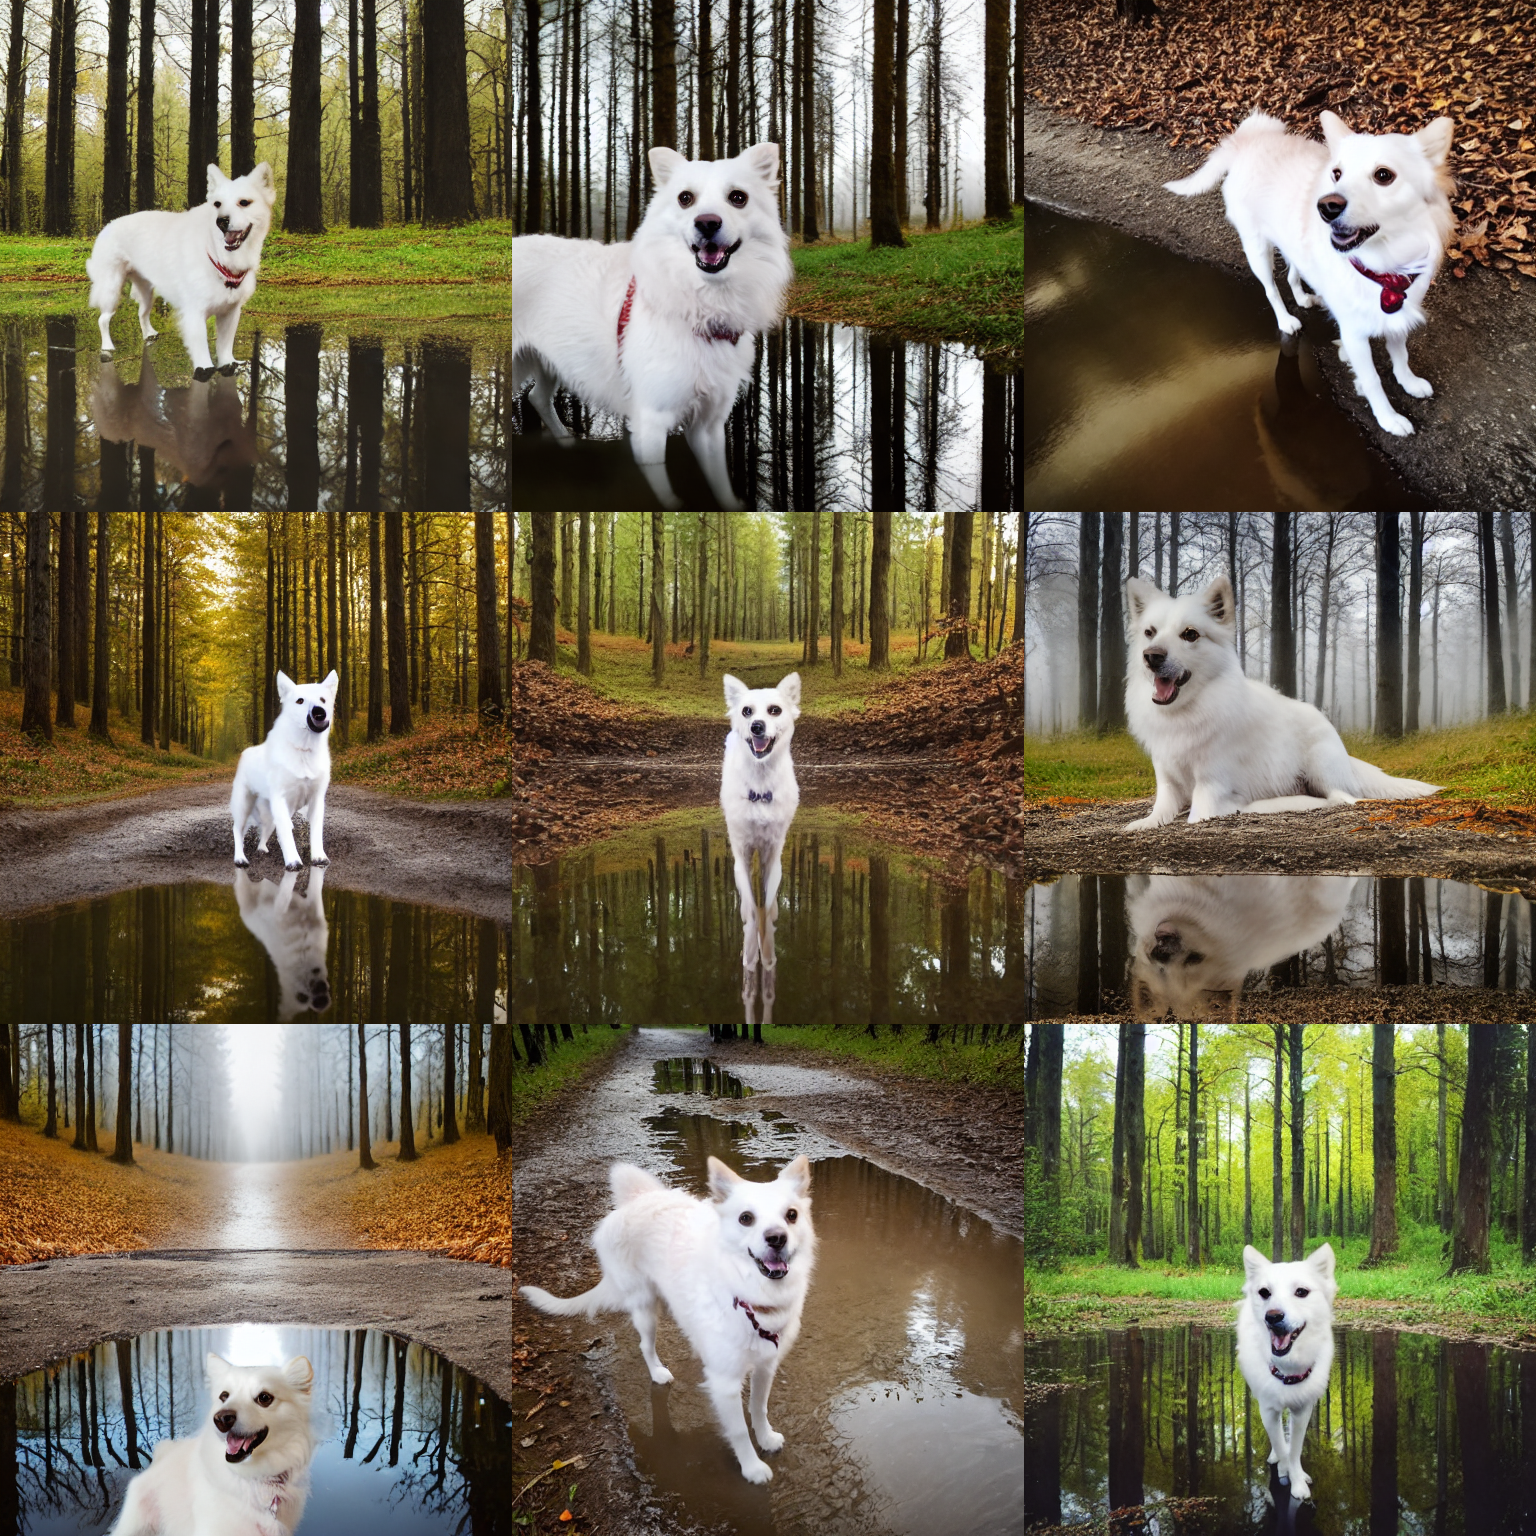
prompt = "framed renaissance portrait of a sks dog"

num_samples = 3
num_rows = 3


all_images = []
for _ in range(num_rows):
    images = pipe([prompt] * num_samples, num_inference_steps=75, guidance_scale=7.5, seed = 'random').images
    all_images.extend(images)

grid = image_grid(all_images, num_samples, num_rows)
grid 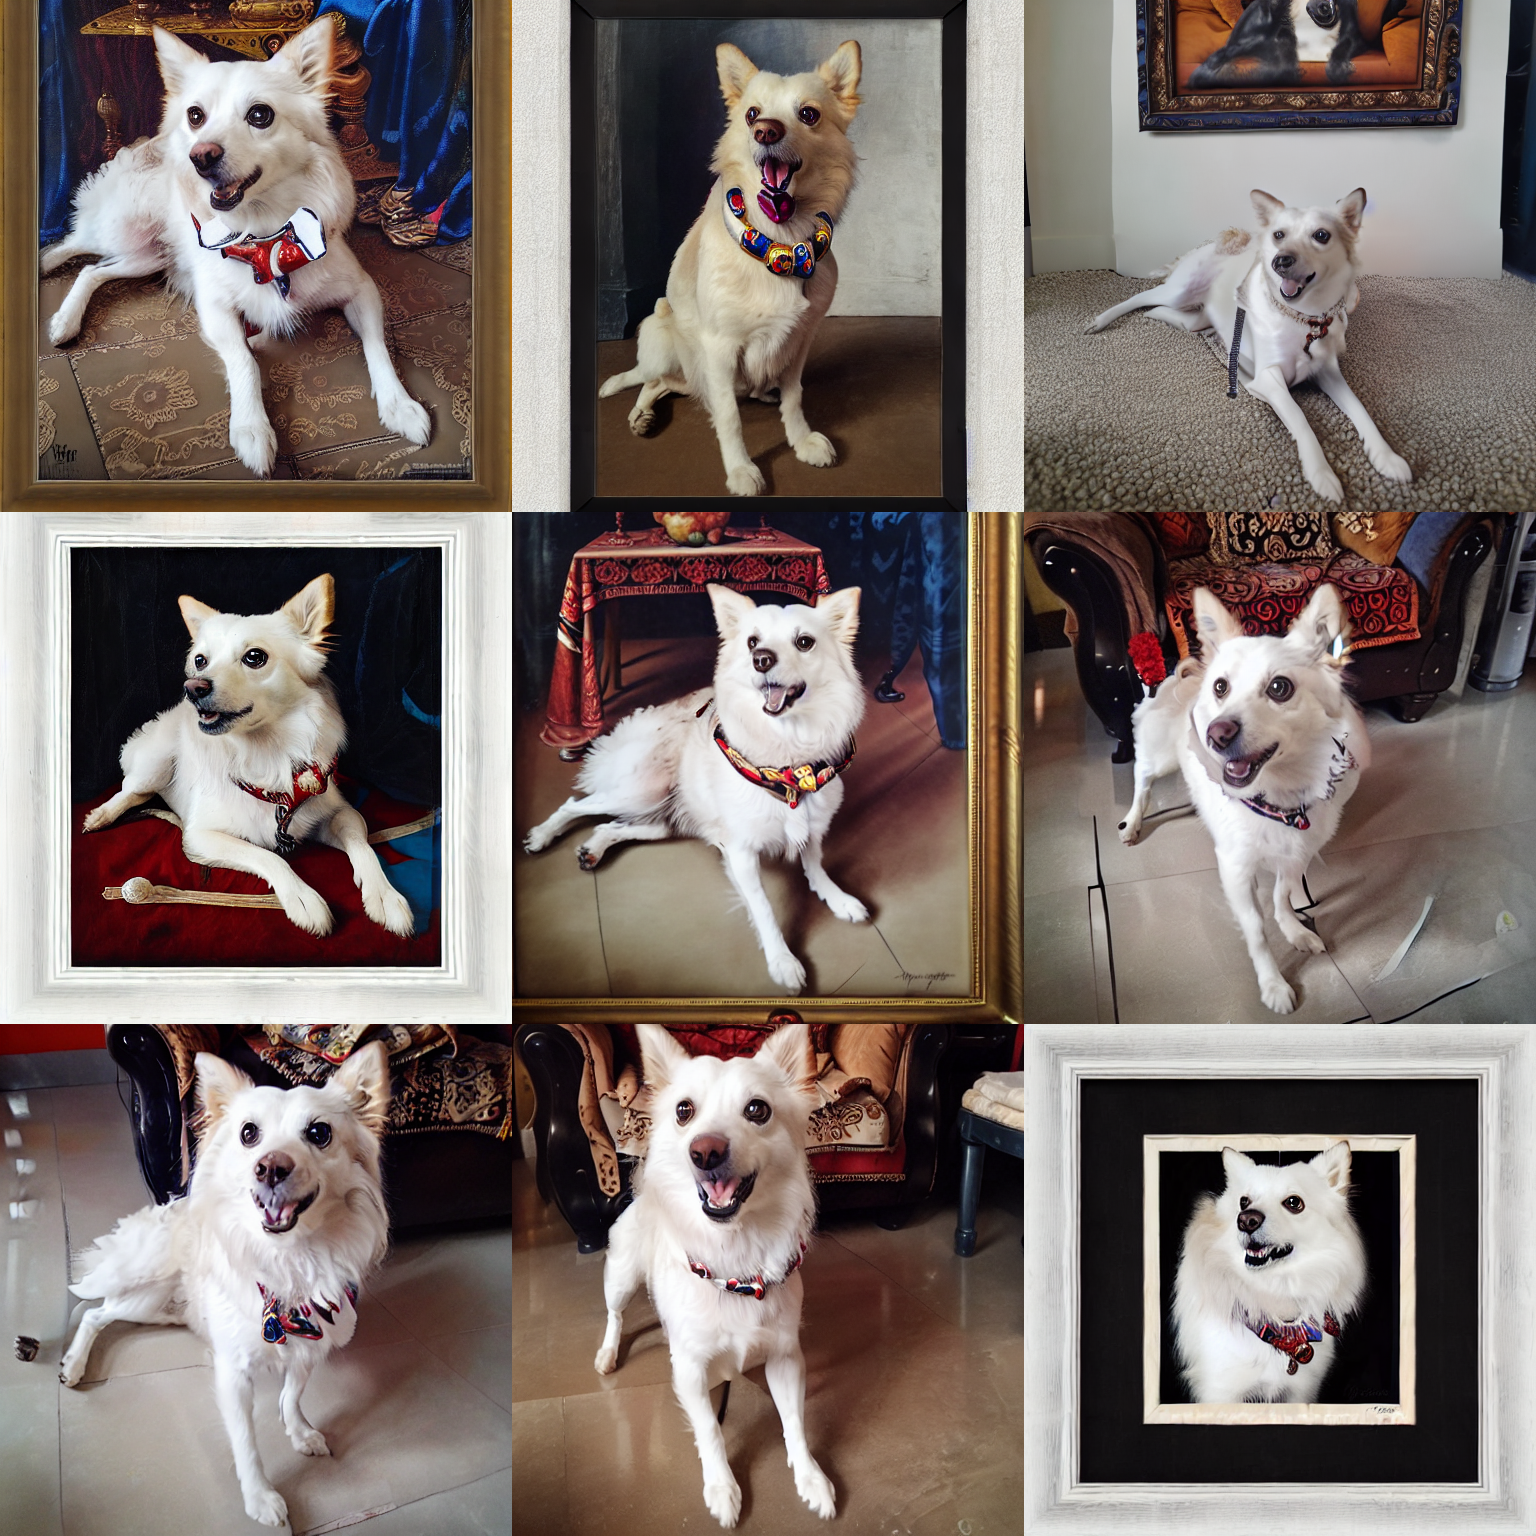
In the below results, the prompt is truncated since CLIP can only handle prompts with maximum of 77 tokens
prompt = "a sks dog as god with a radiant halo, wings, detailed face, gorgeous, flowing hair, very muscular male body, partial anatomy, stormy and grand war scene, delicate and intricate borders for decoration, caesar victorious, proud Emperor, crepuscular ray, intricate, highly detailed, 8K, digital painting, fantasy, concept art, sharp focus, over-shoulder shot, illustration, art by greg rutkowski beeple and alphonse mucha"
num_samples = 3
num_rows = 3


all_images = []
for _ in range(num_rows):
    images = pipe([prompt] * num_samples, num_inference_steps=75, guidance_scale=7.5, seed = 'random').images
    all_images.extend(images)

grid = image_grid(all_images, num_samples, num_rows)
grid
The following part of your input was truncated because CLIP can only handle sequences up to 77 tokens: ['shot, illustration, art by greg rutkowski beeple and alphonse mucha', 'shot, illustration, art by greg rutkowski beeple and alphonse mucha', 'shot, illustration, art by greg rutkowski beeple and alphonse mucha']The following part of your input was truncated because CLIP can only handle sequences up to 77 tokens: ['shot, illustration, art by greg rutkowski beeple and alphonse mucha', 'shot, illustration, art by greg rutkowski beeple and alphonse mucha', 'shot, illustration, art by greg rutkowski beeple and alphonse mucha']The following part of your input was truncated because CLIP can only handle sequences up to 77 tokens: ['shot, illustration, art by greg rutkowski beeple and alphonse mucha', 'shot, illustration, art by greg rutkowski beeple and alphonse mucha', 'shot, illustration, art by greg rutkowski beeple and alphonse mucha']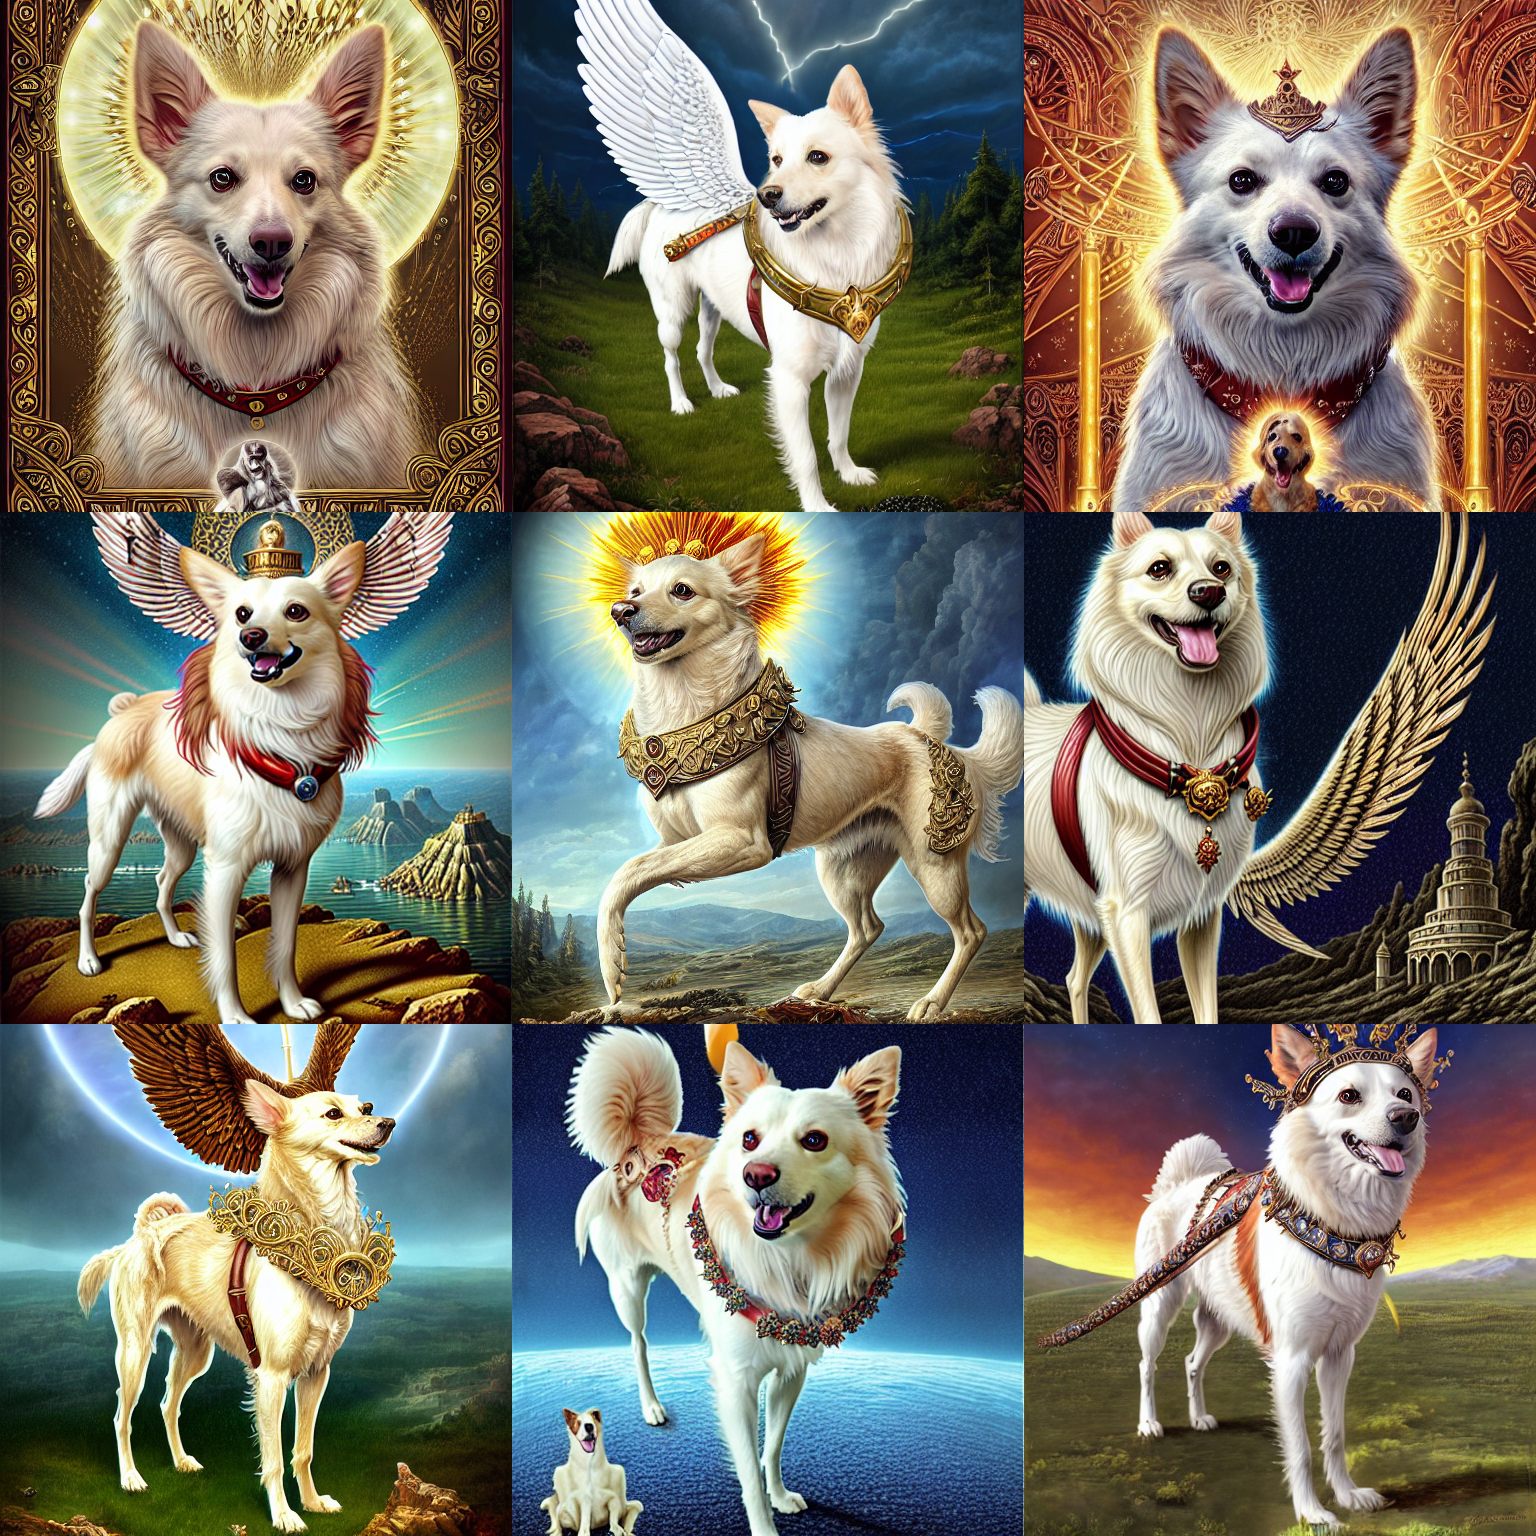
prompt = "a sks dog as god with a radiant halo, wings, detailed face, gorgeous, flowing hair, very muscular male body, stormy and grand war scene, delicate and intricate borders for decoration, caesar victorious, proud Emperor, crepuscular ray, intricate, highly detailed, 8K, digital painting, fantasy, concept art, sharp focus, over-shoulder shot, illustration, art by greg rutkowski beeple and alphonse mucha"
num_samples = 3
num_rows = 3


all_images = []
for _ in range(num_rows):
    images = pipe([prompt] * num_samples, num_inference_steps=75, guidance_scale=7.5, seed = 'random').images
    all_images.extend(images)

grid = image_grid(all_images, num_samples, num_rows)
grid
The following part of your input was truncated because CLIP can only handle sequences up to 77 tokens: [', art by greg rutkowski beeple and alphonse mucha', ', art by greg rutkowski beeple and alphonse mucha', ', art by greg rutkowski beeple and alphonse mucha']The following part of your input was truncated because CLIP can only handle sequences up to 77 tokens: [', art by greg rutkowski beeple and alphonse mucha', ', art by greg rutkowski beeple and alphonse mucha', ', art by greg rutkowski beeple and alphonse mucha']The following part of your input was truncated because CLIP can only handle sequences up to 77 tokens: [', art by greg rutkowski beeple and alphonse mucha', ', art by greg rutkowski beeple and alphonse mucha', ', art by greg rutkowski beeple and alphonse mucha']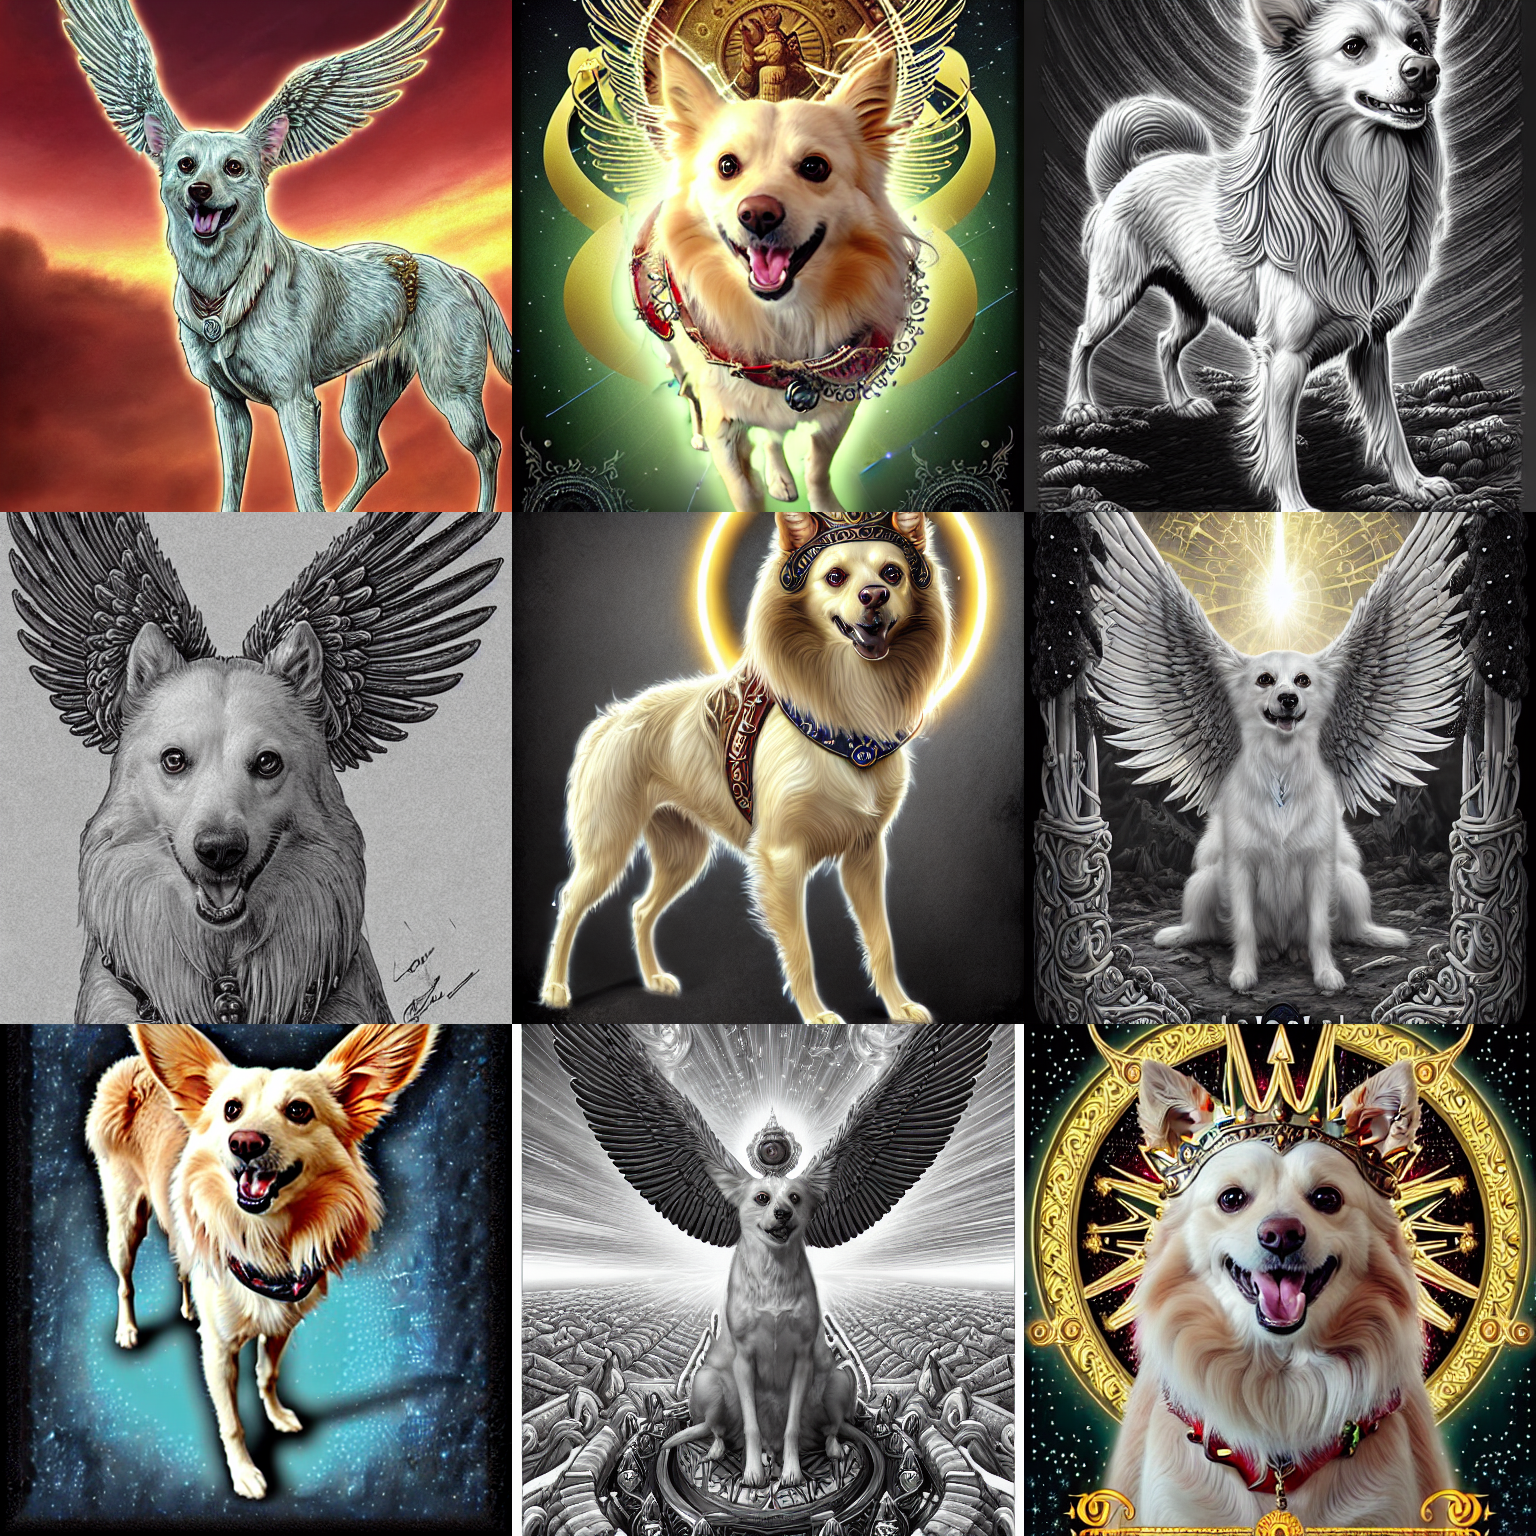
HuggingFace Hub is a platform with over 60K models, 6K datasets and 6K demo apps(spaces) all open source and publicly available. The best part is that sharing and using any public model on the Hub is completely free of cost. Let’s next see how we can move our model from Google Drive to HuggingFace Hub. In order to push model to hub, make sure that you have used Access token with write permission while authenticating to HuggingFace
The get_full_repo_name returns the repository name for given model in user’s namespace ({username/model_name}).
from huggingface_hub import get_full_repo_name
model_name = "pintu_dreambooth"
hub_model = get_full_repo_name(model_name)
hub_model'prajwal13/pintu_dreambooth'output_dir = "/content/gdrive/My Drive/pintu_dreambooth"
images_folder = "/content/gdrive/My Drive/pintu"
torch_device = "cuda" if torch.cuda.is_available() else "cpu"We can then use create_repo to create an empty directory in HuggingFace hub and push our model and the images used for training to the empty repo.
from huggingface_hub import HfApi, create_repo

create_repo(hub_model)
api = HfApi()
api.upload_folder(folder_path=output_dir, path_in_repo="", repo_id=hub_model)'https://huggingface.co/prajwal13/pintu_dreambooth/tree/main/'api.upload_folder(folder_path=images_folder, path_in_repo="concept_images",repo_id=hub_model)'https://huggingface.co/prajwal13/pintu_dreambooth/tree/main/concept_images'The last thing to do is create a model card so that our model can easily be found on the Hub. We will also add the images used to train in the model card
from huggingface_hub import ModelCard
import os
images_upload = os.listdir(images_folder)
image_string = ""
for i, image in enumerate(images_upload):
image_string = f'''{image_string}'''
image_stringcontent = f"""
---
license: mit
tags:
- pytorch
- diffusers
- dreambooth
---
# Model Card for Dreambooth model trained on My pet Pintu's images
This model is a diffusion model for unconditional image generation of my cute pet dog Pintu trained using Dreambooth concept. The token to use is sks .
## Usage
from diffusers import StableDiffusionPipeline
pipeline = StableDiffusionPipeline.from_pretrained({hub_model})
image = pipeline('a photo of sks dog').images[0]
image
These are the images on which the dreambooth model is trained on
{image_string}
"""card = ModelCard(content)
card.push_to_hub(hub_model)'https://huggingface.co/prajwal13/pintu_dreambooth/blob/main/README.md'Now we can directly load the model from HuggingFace Hub by passing the repo id to the pipeline
from diffusers import StableDiffusionPipeline

pipeline = StableDiffusionPipeline.from_pretrained(hub_model).to(torch_device)
image = pipeline("a photo of sks dog wearing glasses, and standing near beach").images[0]
image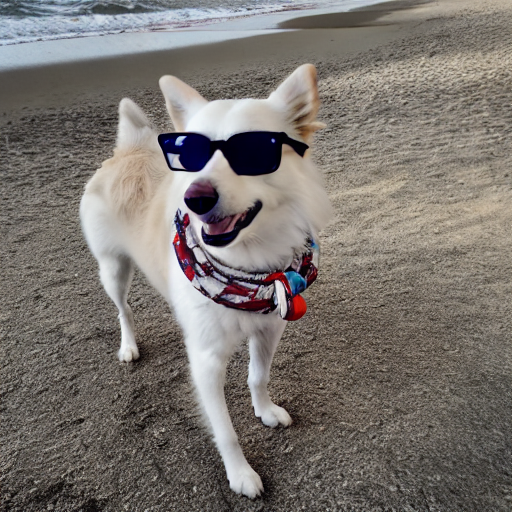
In this post, we learnt about Dreambooth and how we can personalize the Stable Diffusion model. We also learnt how to push our model to HuggingFace hub.
I hope you enjoyed reading it. If there is any feedback, feel free to reach out on LinkedIn or on mail